LXC 安裝 Windows 11,並分享 i915 內顯
這裡分享我在 Ubuntu Server 22.04 用 LXC 安裝 Windows 11,以及分享內顯 i915給虛擬機的的紀錄。 要讓虛擬機可以使用 GPU,最常見的是 GPU passthrough,但是 GPU passthrough 只能給一個虛擬機使用,要讓多個虛擬機同時使用的話,必須打開 i915 的 SR-IOV ,可以多 7 個 VGA 來分享給虛擬機。
準備
安裝 incus
根據 https://linuxcontainers.org/incus/docs/main/installing/#installing 的說明,Ubuntu 22.04 還沒辦法使用 apt 來安裝,因此依照 https://github.com/zabbly/incus 的說明來安裝:
curl -fsSL https://pkgs.zabbly.com/key.asc | gpg --show-keys --fingerprint
mkdir -p /etc/apt/keyrings/
sudo curl -fsSL https://pkgs.zabbly.com/key.asc -o /etc/apt/keyrings/zabbly.asc

sudo sh -c 'cat <<EOF > /etc/apt/sources.list.d/zabbly-incus-stable.sources
Enabled: yes
Types: deb
URIs: https://pkgs.zabbly.com/incus/stable
Suites: $(. /etc/os-release && echo ${VERSION_CODENAME})
Components: main
Architectures: $(dpkg --print-architecture)
Signed-By: /etc/apt/keyrings/zabbly.asc
EOF'

sudo apt update
sudo apt install incus
設定 incus
使用 sudo incus admin init 來設定,會問一堆問題,如下:
Would you like to use clustering? (yes/no) [default=no]:
Do you want to configure a new storage pool? (yes/no) [default=yes]: no
Would you like to create a new local network bridge? (yes/no) [default=yes]: no
Would you like to use an existing bridge or host interface? (yes/no) [default=no]: yes
Name of the existing bridge or host interface: enp3s0
Would you like the server to be available over the network? (yes/no) [default=no]: yes
Address to bind to (not including port) [default=all]:
Port to bind to [default=8443]:
Would you like stale cached images to be updated automatically? (yes/no) [default=yes]:
Would you like a YAML "init" preseed to be printed? (yes/no) [default=no]:
大部分都預設就可以。
建立 pool
sudo incus storage create vmpool dir source=/lvm1/lxd_storage
建立 profile
sudo incus profile copy default windows
編輯profile,內容如下:
config:
  limits.cpu: "16"
  limits.memory: 16GiB
  raw.qemu: -device intel-hda -device hda-duplex -audio spice
description: 'Windows: 16CPU, 16GB RAM, 1024GB DISK'
devices:
  eth0:
    name: eth0
    nictype: macvlan
    parent: br0
    type: nic
  root:
    path: /
    pool: vmpool
    type: disk
  vtpm:
    path: /dev/tpm0
    type: tpm
name: windows
used_by: []
安裝需要的套件
sudo apt-get install genisoimage libguestfs-tools wimtools --yes
sudo snap install distrobuilder --classic
轉換 ISO
我們需要把Windows ISO轉換為lxc可用的ISO,先準備好原本的Windows ISO,這裡的檔名是 Win11_23H2_Chinese_Traditional_x64v2.iso,記得換成你自己的檔名。
命令如下:
sudo distrobuilder repack-windows Win11_23H2_Chinese_Traditional_x64v2.iso Win11_23H2_Chinese_Traditional_x64v2.lxd.iso
我們把 Win11_23H2_Chinese_Traditional_x64v2.iso 轉為 Win11_23H2_Chinese_Traditional_x64v2.lxd.iso。
等一下 Win11_23H2_Chinese_Traditional_x64v2.lxd.iso 就是要餵給虛擬機安裝的檔案。
讓操作端跟 server 端可以互連
因為 Ubuntu server 沒有 GUI,都是透過命令操作,所以當虛擬機開機之後沒有辦法顯示畫面。所以我們需要從另一台 Windows 來把虛擬機開機,並在這台 Windows 上顯示並操作安裝畫面,這樣才可以安裝 Windows 虛擬機。
Ubuntu server 我們就稱為 server 端。 Windows 這邊我們就稱為操作端。
server 端
這邊我們要讓 lxc 新增一個操作端,如下:
sudo incus config trust add awn-pc1
然後會跳出一堆字串,類似這樣:
ucRZ8JO48d4J32MRZ1tuuvNh3Wg86Pb7LZ4QKk090BM3jA2SIRh9aDB1mQ4dZ0H76PJll1bb0YkG2ZK8l5YYPWX5Cw4UhVs2li722P5s7A45MW4B5WBXBQXFPT170L50MsMMjB8ZiVhO6Ug2JWXGwdxp897u8cELqE6AAbA901uUCBwo80qr5czfR2Pk3QS7JCRb9LFa6uKKQsQKSDHm76814UOD3Knf50E9cq3GB6C28A0B54NKBw9T5004ZQ75QqCZqBD0F32mjfAILGCI57R09RN81LHMJ0NLVAXAKQc2LTh0aHYjsO6J41ERLAQF8bk7T07cG4611YT6F57Y6lr93ZSc5L0W7F5R5RG7Xr6e0gJ6dXh5iI18uwpUrZ6MAhN6GSUSGYTqe218He5gLa3G3UMNAJY1PlLSShcV91UF3Z18QloVR8DP9O6wYa7R9LG2Cv04MDSIK8Hs94ZPQ4hsbS1BT2J5QqZ41su06R9a8WTjP9rX8hNsQz5x5744AJl2656SdUqbos4JKX9B2IbGheqK94D7Ya0SZYiODX7Y5rIWdH1P6M6e5J75nN6En0Y9UmgRCGE2WIeG6jXFhpb7
這個記下來,等一下要在操作端輸入。
操作端
命令:
incus remote add awin-pc2 192.168.1.24
然後輸入剛剛那一串字串。
接著命令:
incus switch awin-pc2
之後就可以在操作端啟動 server 端的虛擬機了。
建立虛擬機
server 端命令:
sudo incus init --empty --vm --profile=windows MY-VM-WIN11
sudo incus config device add MY-VM-WIN11 install disk source=/home/awin/lxd/Win11_23H2_Chinese_Traditional_x64v2.lxd.iso boot.priority=10
操作端命令:
incus start MY-VM-WIN11 --console=vga
操作端會跳出一個新視窗,然後就是 Windows 的安裝流程,記得在 “Press any key to boot from CD” 文字出現的時候趕快按一個鍵進入安裝流程。
來不及的話,左上角按鈕可以發送 ctrl+alt+del 來重新開機。
這邊要注意的是,一旦發生重開機的狀況,剛剛那個視窗會關掉,然後跳一堆錯誤訊息,像是:
(remote-viewer.exe:23816): GSpice-CRITICAL **: 22:48:14.989: _usbdk_hider_update: assertion 'priv->usbdk_api != NULL' failed

(remote-viewer.exe:23816): GLib-GIO-WARNING **: 22:48:15.475: Unexpectedly, UWP app `Microsoft.OutlookForWindows_1.2024.214.400_x64__8wekyb3d8bbwe' (AUMId `Microsoft.OutlookForWindows_8wekyb3d8bbwe!Microsoft.OutlookforWindows') supports 4 extensions but has no verbs

(remote-viewer.exe:23816): GLib-GIO-WARNING **: 22:48:15.598: Unexpectedly, UWP app `Microsoft.ScreenSketch_11.2401.37.0_x64__8wekyb3d8bbwe' (AUMId `Microsoft.ScreenSketch_8wekyb3d8bbwe!App') supports 29 extensions but has no verbs

(remote-viewer.exe:23816): GLib-GIO-WARNING **: 22:48:15.600: Unexpectedly, UWP app `Clipchamp.Clipchamp_3.0.10220.0_neutral__yxz26nhyzhsrt' (AUMId `Clipchamp.Clipchamp_yxz26nhyzhsrt!App') supports 41 extensions but has no verbs

(remote-viewer.exe:23816): GSpice-CRITICAL **: 22:48:15.677: _usbdk_hider_update: assertion 'priv->usbdk_api != NULL' failed

(remote-viewer.exe:23816): GSpice-WARNING **: 22:48:15.677: Warning no automount-inhibiting implementation available
Error: tls: failed to send closeNotify alert (but connection was closed anyway): write tcp 192.168.1.24:8443->192.168.1.154:50714: write: broken pipe
這時用 incus console MY-VM-WIN11 --type=vga 就可以再次連上已開機的虛擬機,不要用 incus start MY-VM-WIN11 --console=vga。
只要虛擬機沒有關機,就是用 incus console MY-VM-WIN11 --type=vga 來連上畫面。
關機的情況下才是用 incus start MY-VM-WIN11 --console=vga 來開機並顯示畫面。
再來 Windows 11 沒有網路會無法安裝,所以要跳過網路檢查,在最早的安裝畫面按 shift+F10 打開 command line,然後輸入:
oobe/bypassnro
安裝之後,把虛擬機連上 macvlan。
sudo incus config device override MY-VM-WIN11 eth0 nictype=macvlan
這樣虛擬機就有網路了。
虛擬機裝好之後
虛擬機操作
- 把遠端桌面連線打開
- 下載 driver: virtio-win-guest-tools.exe ,然後安裝。
分享內顯給虛擬機
準備
安裝需要的套件
apt install build-* dkms
確認你的 kernel 是 6.1 ~ 6.5:
uname -r
# 6.5.0-26-generic
安裝 i915 Driver
下載 i915 Driver:
git clone https://github.com/strongtz/i915-sriov-dkms
進到剛剛 clone 的目錄,修改 dkms.conf,把 PACKAGE_NAME 改為 "i915-sriov-dkms",把 PACKAGE_VERSION 改為 "6.5",看你的 kernel 版號多少就改多少。我的版本是 6.5 ,所以這裡填 6.5。
cd i915-sriov-dkms
nano dkms.conf

# 前 2 行改成這樣
# dkms.conf
PACKAGE_NAME="i915-sriov-dkms"
PACKAGE_VERSION="6.5"
安裝 driver:
# 記得要在 i915-sriov-dkms 這目錄裡面
dkms add .
dkms install -m i915-sriov-dkms -v 6.5
dkms remove -m i915-sriov-dkms -v 6.5
dkms install -m i915-sriov-dkms -v 6.5
如果有出現類似以下的錯誤:
update-initramfs: Generating /boot/initrd.img-6.5.0-26-generic
W: Possible missing firmware /lib/firmware/i915/mtl_gsc_102.0.0.1511.bin for module i915
W: Possible missing firmware /lib/firmware/i915/mtl_huc_8.4.3_gsc.bin for module i915
W: Possible missing firmware /lib/firmware/i915/mtl_guc_70.6.4.bin for module i915
去 https://cgit.freedesktop.org/drm/drm-firmware/refs/ 把檔案找出來,放到 /lib/firmware/i915/ 然後再重新安裝。
檢查是否有安裝成功:
modinfo i915 | grep vf

# 應該要出現如下訊息
# parm:           max_vfs:Limit number of virtual functions to allocate. (0 = no VFs [default]; N = allow up to N VFs) (uint)
如果沒有就重新安裝試試。
修改 grub:
nano /etc/default/grub

# "GRUB_CMDLINE_LINUX_DEFAULT" 這一行加入:"quiet intel_iommu=on i915.enable_guc=3 i915.max_vfs=7",如下:
GRUB_CMDLINE_LINUX_DEFAULT="quiet intel_iommu=on i915.enable_guc=3 i915.max_vfs=7"
更新 grub 和 initramfs:
update-initramfs -u -k all
update-grub
開機自動自動設定 vGPU 的數量:
sudo nano /etc/rc.local

# 加入
echo 7 > /sys/devices/pci0000:00/0000:00:02.0/sriov_numvfs
然後 sudo chmod +x /etc/rc.local
重開機,開機之後檢查 VGA 數量是不是有 8 個(1 個是原本的,另外 7 個是可以分享給虛擬機的 )。
lspci | grep 00:02

# 應該找到 8 個
00:02.0 VGA compatible controller: Intel Corporation AlderLake-S GT1 (rev 0c)
00:02.1 VGA compatible controller: Intel Corporation AlderLake-S GT1 (rev 0c)
00:02.2 VGA compatible controller: Intel Corporation AlderLake-S GT1 (rev 0c)
00:02.3 VGA compatible controller: Intel Corporation AlderLake-S GT1 (rev 0c)
00:02.4 VGA compatible controller: Intel Corporation AlderLake-S GT1 (rev 0c)
00:02.5 VGA compatible controller: Intel Corporation AlderLake-S GT1 (rev 0c)
00:02.6 VGA compatible controller: Intel Corporation AlderLake-S GT1 (rev 0c)
00:02.7 VGA compatible controller: Intel Corporation AlderLake-S GT1 (rev 0c)
設定 vGPU 給虛擬機
可以分享的 VGA 有 00:02.1 ~ 00:02.7 ,然後在虛擬機裡面新增一個 device:
sudo incus config device add MY-VM-WIN11 gpu pci address=0000:00:02.1
然後在操作端把虛擬機開機:
incus start MY-VM-WIN11 --console=vga
這時後會變成黑畫面,像這樣:

大概等個 1~3 分鐘就會跳出開機畫面了。
開機好之後,裝置管理員會出現一張顯卡,去 Windows Update 更新,就會出現 Intel UHD 770 顯示卡了。
分數
Furmark 2 分數

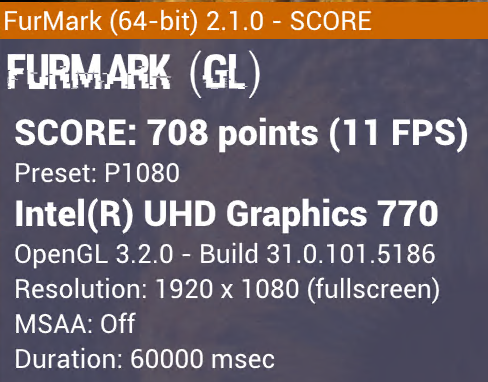
不優,但總比沒有強。
